Saturday, November 25, 2017

Pinspired!

Each month a talented Design Team Member will choose a project on our Scor-Pal Pinterest board and get "Pinspired" by it!
They will update it, tweak it a little if they like, and share the tutorial here for you!

This month we have the super creative Lois!

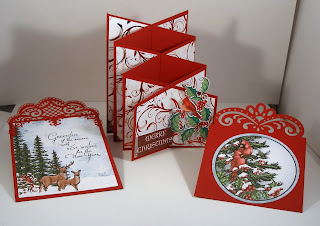
You can get so much inspiration perusing the photos on Pinterest.  The Scor-Pal design team has an on-going project, in which we find a card on Pinterest and use it as inspiration for a new card.  That's what I have done today.  I chose this Cascading Card by Chris Peterson as my inspiration.  It originally appeared on her blog, the Calla Lily Studio Blog.   As Christmas is right around the corner, I changed Chris's very feminine card into a Christmas Card.


To make this card, you start with a piece of cardstock 8" x 12".  On the 8" side, mark 5 1/2" on one end and 2 1/2" on the other; then cut the paper on the diagonal.   Unless your cutter is big enough, it is easier to cut it with an Exacto knife and a metal ruler, which is what I did.  I found that anchoring the cardstock with a couple pieces of washi tape kept it from sliding during the cutting process.


Score each piece at 4" and 8".


Measure up 2 3/4" from the bottom of the taller end and make a mark.  Measure up 1 1/4" from the bottom of the shorter end and make a mark.  Draw a line between the two marks.


On one piece of cardstock, cut DOWN to the pencil line at 2" and 10" -- and cut UP to the pencil line at 6".  On the other piece of cardstock, cut UP to the pencil line at 2" and 10" -- and cut DOWN to the pencil line at 6".


Erase the pencil lines.   Stack the two pieces together and slot them together by sliding the cut lines over one another.  I found it easier if you slotted the two center cut lines first and then maneuvered the cardstock and slotted the end cut lines.  Fold OUT at the score lines to form the cascade.  Using a bone folder, give the edges a sharp score.


You can then decorate the card as you wish.  I cut pieces of patterned paper to cover the side sections, as follows:

Front panel - 2 3/4" x 3 3/4" - fold in half and cut the top diagonally from the center to 2 1/4" on each side.

Six panels 1 3/4" wide, cut as follows:
2 panels 3 1/8" high
2 panels 4 1/4" high
2 panels 5 3/8" high

Each panel is then trimmed diagonally by 1/4" from the outside to the inside, as shown in the photo.


I then made two inserts, using die cuts and patterned paper.  They are 3 7/8" wide and can be as short or tall as you prefer.  These will slip inside the two open sections of the card.


Here is a photo of the card and the inserts.


I hope you give this fun technique a try.  And be sure to check out our Scor-Pal Scoring Projects and Ideas on Pinterest.

Wednesday, November 15, 2017

Mid Challenge Tutorial

This fabulous project was from one of team members in our current challenge and we wanted for you to be able to create it yourself so we have the tutorial for you.

It's time for a new monthly challenge at Scor-Pal!

This month, the challenge was to create a special gift packaging.  I'm the November
hostess, so I'm going to show you how I made my project this month!

With Christmas fast approaching, I decided to made a little box to hold some hot cocoa and fixins.

Here's what I made, using my Scor-Pal Eighths1/2" Scor-Tape, and 1/4" Scor-Tape:


Here is the completed project:


And here's how I did it:

First, I laid everything out to determine an approximate size of my box.
(Please ignore my post it pad - I forgot to remove it prior to taking pics)
After trying a few different layouts, I decided on a box that would be a finished size of 5.5" x 3.5", so...


I began with a piece of cardstock that measured 8.5" x 6.5", and scored it on all four sides at 1.5".

I burnished all fold lines, and trimmed in a bit on each of the flaps for a cleaner fold,
as shown below.  Scor-tape was added to all four flaps.

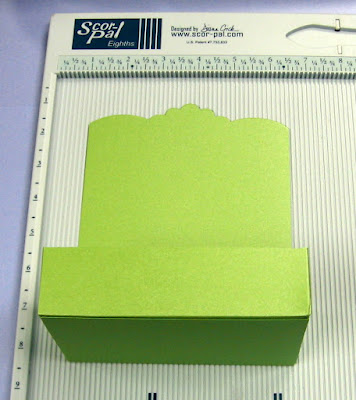
Here's the finished box.

Next, the box needed a 'back', so I took a 5/5" x 11" panel, and scored on the long side at 3/5".

The next step was to make a decorative top to the box, using a die, as shown below.

A piece of designer cardstock was cut to 5.25" wide, the same die was used to scallop the top,
and the length was cut to 6 7/8" from center point to bottom edge.
Add Scor-Tape to the back of cardstock.

 Here's the finished panel.


Adhere the patterned panel to the green base. Set aside.

Add Scor-Tape to the bottom and back edge of 'box, and adhere to your box 'back'.

It will look like this:


Cut 1 strip of cardstock 1/25" x 5/25" for the front edge of box.
Cut 2 strips of cardstock 1/25" x 3 3/8" for the two sides of the box.

Add some shredding material to your box.

Arrange items in box, wrap with cellophane, if desired, and deliver to happy recipient!


Thanks for stopping by today!

I hope that you'll make something fun this month, and enter it in the 'More than one fold' 'Special Gift Packaging' challenge at Scor-Pal

If we have 10 or more entries, a winner is chosen randomly, and that winner gets to shop in the Scor-Pal online store!  It could be YOU!!!

Have a great November!!!

Patti J.

Sunday, November 5, 2017

Challenge #42 Winner Treat Holders

Time for the winner this month
Although there were 16 entries, 9 were by the same person and as our rules state each person can enter only 3 times.
But even if we take the 6 disallowed entries out we are left with 10 so we can have a winner!
So at random the winner is Early Morning Crafts!!
Please email me HERE and I will send you details of how to get your prize
You will receive a $20 Gift Certificate to the Scor-Pal Store!


Hopefully we will have the required 10 entries with the current challenge Special Gift Packaging, be sure to enter so we can have a winner!
Katie

Wednesday, November 1, 2017

Scor-Pal More than One Score Challenge #43 Special Gift Packaging

Welcome to the 43rd Monthly Challenge here at Scor-Pal!
We love showing our projects to you and now it's your chance to show your creations to us!

This month we want to see your "Special Gift Packaging", go ahead wow us!

Each month we will have a different theme and you will have a month to create and enter your projects. As well as the theme you will need to make "More Than One Score" and tell us where you used the Scor-Pal on your project. So a single fold card won't count but an Easel, Gatefold, Stair Step, etc will :) Also we love to see your "Anything But a Card" projects, just as long as you make "More Than One Score"
We have a nice set of samples from the Design Team, just click on their names to go to their blogs for more details on their creations.


Katie Tate


Lois Bak


Steph Ackerman


Toni Storie


Patti


Isia


Ruza


The prize for our winner will be a $20 Gift Certificate from the Scor-Pal Store!

Challenge Rules:
1. Each entry must have "More Than One Score"*, mention where the Scor-Pal tool was used and follow the theme.
2. Entry can be combined with as many challenges as you like.
3. 3 entries allowed per person.
4. You must link back to the Scor-Pal blog to be considered for a prize.
5. No backlinks will be accepted.
6. Each challenge will last from the 1st day of the month until 10pm on the last day of that month.
7. Winner will be announced on the 5th of the following month.
8. Entries not adhering to the rules may be deleted.
9. Prizes will be awarded when the challenge has at least 10 entries

* "More Than One Score" means that a single scored fold card (ie: a simple square or rectangle) with no additional use of the Scor-Pal tool will not count as an entry.

Please add your link below and Good Luck!